Email configuration based on the purpose - here I have written some configuration setup for while printing sales order confirmation using print management, the attachment will send automatically to the customer.
Before print invoice need to set up a few more configurations
1. Select account receivable module

2. Open common area node -> select customer -> all customer

3. Select customer Tab -> Accounts
4. Select Contacts -> view contacts

5. View contacts travers to sales and marketing -> common -> contacts -> All contacts


6. Select contact button group -> maintain tab-> View menu item
7. Expand contact information tab
8. Select add button to add description email, type – > E-mail address, add your mail in the contact number/address, set as primary.

9. Select account receivable module -> select setup area select form setup menu item under the Form menu.

10. Select general tab – click to print management

11. Select a sales order confirmation node and extend the plus symbol. There is an original setup is available.

12. Click the original node and set up the default printer settings and then add a new node on the original node.

13. Give the node a name (Like “E-mail”) and set up a condition for the query/filter. When the filter is true the invoice follows this setup. If not it will default back to “Original” setting.

14. The query needs to be extended to get the required data available. You extend the query by right-clicking the node and select a 1: n or n: 1 relations.

1) n:1 > Customer
2) n:1 > Global address book
3) 1:n > Party location relationship
4) 1:n > Locations
5) 1:n > Communication details
6) 1:n > Contact information and role relationship
7) n:1 > Roles
15. That should give you a query like this.

16. Click add button add roles table and a select role field, you can select criteria like a customer, invoice. Which is your purpose.

17. You can add a new role based on user choice. Go to: Organization administration > Setup > Global address book > Address and contact information purpose
18. Add a new type and tick both Contact information and Postal address check boxes.

19. Setup the print to e-mail
20. Now set up the printing settings by selecting the arrow at the end of the “Destination” and select “Printer setup”.
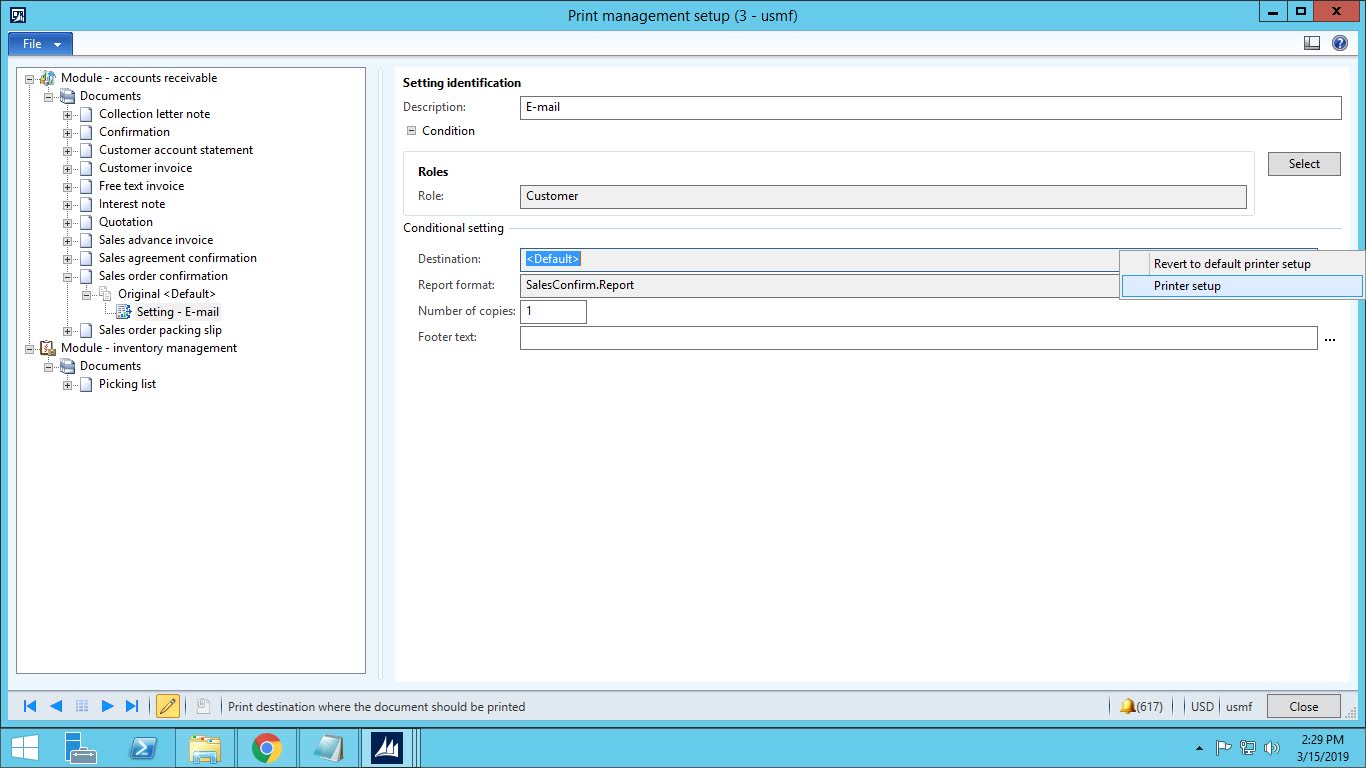
21. Notice that you can add a preferred footer for the invoice. Select “E-mail” in the left column. Then on the “To” line select the “Edit” and in the Customer, purpose field selects the role you created in Step 1 (Like “Customer”).


22. Print sales order confirmation report using print management.

1. 23. Successfully send attachment to customer


